Paper Photos Pre-Scanning Preparation
Follow these simple steps to organize, clean, and label your paper photos so your scans look great and stay in the order you want.
Order Forms | Shipping Instructions | Need it NOW? Expedited Options
Stack Photos, No Albums, No Pictures in Frams
We need your photos in stacks, not loose in a box in no order at all. Not in picture frames. They must be removed before you send them. No photos in albums of any kind. Remove and stack them in the order you want them scanned. We will do our best to keep them in order.
Avoid Rubber Bands
Be very careful with rubber bands. They can bend and damage photos. Most customers separate groups by placing them in envelopes big enough to hold them flat—no rubber bands needed. Please don’t pack with shredded paper or debris that can interfere with scanning.
Clean Your Paper Photos
Please clean your photos! Wipe both front and back gently with a very soft cloth before stacking. We do not clean paper photos before scanning. Even light dust can reflect the scanner light and create white spots. If dried glue is present (from album pages), brush it off the back as well. At our low prices, we can’t be responsible for dust in your scans.
Mixing Different Sizes
You can mix photo sizes in the same show—no need to separate by dimensions.
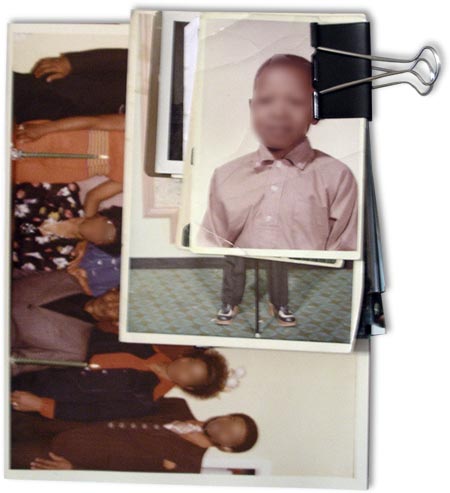
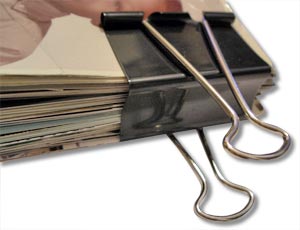
Keep Groups Together With Binder Clips
Binder clips are a simple way to keep mixed-size stacks together. After clipping, place each stack into a correctly sized envelope for added protection.
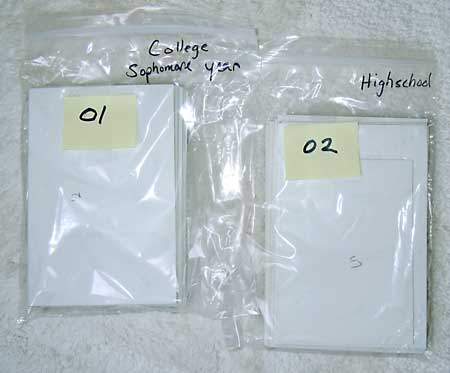
Use Plastic Bags & Labels
NUMBER your stacks if a particular order is desired. Labeled bags are great for transport and easy identification.
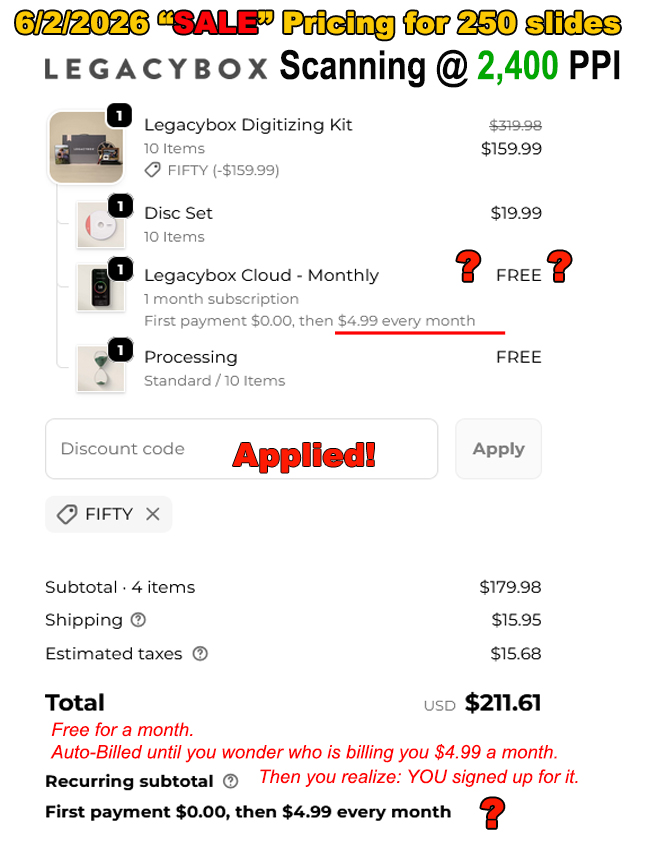
Scanning Resolution
Paper photos are scanned at 600 pixels per inch, and delivered at 600 ppi—high resolution suitable for printing.
How Many Photos per “Chapter” or “Show”
For easier navigation, we recommend 100–150 photos per chapter. More chapters usually make better menus.
Numbering Paper Pictures
Label each stack according to the chapter you want. If chapter 3 has multiple stacks, label them #3a, #3b, #3c so we know they belong together.
NOTICE: Don’t number all 500 photos from #1–#500 if they go into separate chapters. Each chapter starts at #1 and continues through the end of that stack. Your numbers may not match our internal numbering exactly—this is normal.
Write on Backs with Pencil Only
CAUTION: If you write on the back, use pencil, not ink. Permanent markers can transfer and ruin the photo beneath. We’ve seen this happen—please avoid it.
Slide Preparation (do this before shipping) | 35mm Slide Carousel Shipping | Order Forms | Shipping Instructions | Need it NOW? Click here